

As I mentioned previously, my aging back has the been giving me grief over the last little while which means the amount of riding I’ve been doing is precisely zero. That situation is driving be batty beyond words but on the upside it has given me the chance to do some maintenance on my extensive (some would say excessive) fleet of velocipedes.
Today, I’m going to talk about a couple of specific issues relating to the Brompton – finding and stopping creaking noises and the Brompton sinking seat post syndrome. Although the Brompton is extremely well engineered, like anything, it isn’t completely impervious to a few niggles every so often and those two can be particularly frustrating. Water, dirt and aging will eventually catch up with any machine that has moving parts – which means all machines – and because the Brompton has a few more moving parts (at least in the frame) than your average, garden variety bike, there’s a few more issues that may pop up from time to time. It should be noted that I am not a professional bike mechanic and readily seek the assistance of a bike shop when it all gets too hard. I do, however, at least try and have a go at fixing stuff myself where I can and, in doing so, have accumulated a little experience I can share.
Creaking – finding the ghost in the machine
Age, lack of lubrication and dirt can cause your Brompton to start to creak at times. Usually, the creaking will be heard to the rhythm of your pedaling as the frame slightly flexes under the torque created by the power coming from your legs. The trick, though, is to first pinpoint exactly where the noise is coming from. That can be difficult because bike frames have a ventriloquistic quality about them where the noise is echoed from it’s source through the tubing of the frame and can make it sound like the noise is originating from a completely different place to it’s actual origin. Sometimes you will be lucky and find the source quickly but most of the time, you will likely adopt the strategy of lubricating every possible cause until the noise is gone. Here is a small checklist of places to deal with:
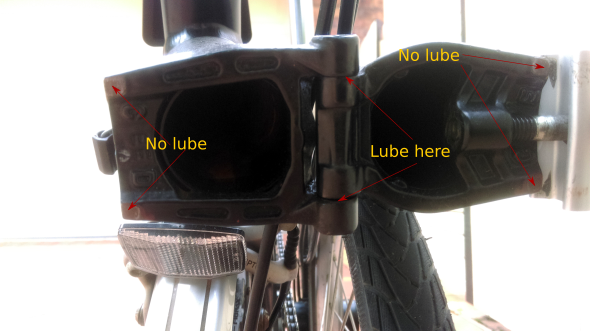
The folding joints. No matter how well you think you’re doing those up (and you shouldn’t be over tightening them, by the way), some play will always occur around these spots. Lube the hinges but do not get any lube on the contact surfaces where the two sides of the joint meet.
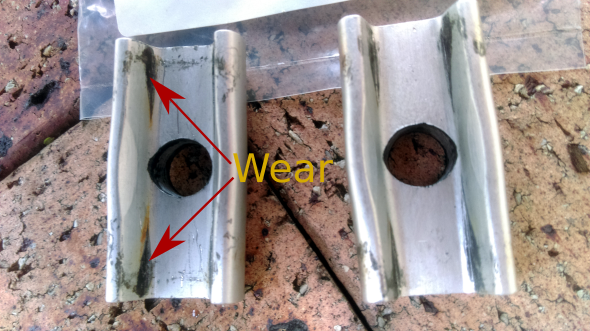
Inspect the aluminium clamp plates and replace them if required. After a while, the insides of the plates start to wear and the plates themselves may bend out slightly which will cause the two halves of the joint to be unable to come together tightly enough no matter how hard you do up the clamp bolts. Just replace them. They’re only a few bucks and may make all the difference. Just don’t over tighten the new ones because they will tend to stick when you undo them and you may need to use the flat screwdriver on your multi-tool to pop them off. Not great when the train is approaching the station and you’re madly trying to fold before it arrives.

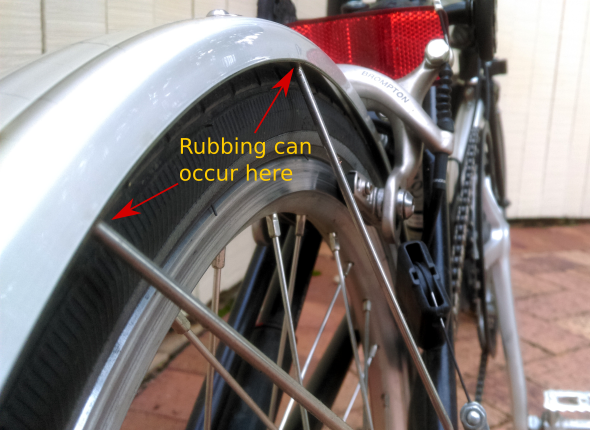
Fender stays fouling on the tyres. Sometimes the source may not be coming from the frame at all. If you have fenders on your Brompton, the clearances between the tyres and the stays that the fenders are mounted on can be quite tight and it only takes a few small knocks to bend the stays in such a way that the tyres begin to rub on them. Lift each wheel and spin it while watching to see if any rubbing occurs and bend the stays back into position. It may take a hard stop on the pedals to replicate the problem too so a friend following you closely and watching may be required.
Getting that sinking feeling
Compared to an ordinary bike, Brompton seat post clamps get opened and closed exponentially more times throughout their lifetime and the seat post slides inside the frame an equal number of times to the clamp. All that opening, closing and sliding causes wear to the sleeve inside the frame that the seat post slides in and also the clamp slowly loosens over time. Not only that, but the clamp also tends to dry out and, after a while, is unable to be closed all the way. All that can cause your seat to creep down slowly over the course of a ride which is pretty annoying.
There a few things you can do to try and fix this. The first and most simple is to lube and tighten the seat post clamp. Brompton seat post clamps aren’t like those found on ordinary bikes. They’re made to be opened and closed continuously and easily and thus produce a much higher torque with a lot less effort required to operate them. What that means to you is that when you’re adjusting the nut to make the clamp tighter, your adjustments should only me microscopic – an eighth to a quarter of a turn at a time. And if you find that you’re having to put anywhere near as much pressure on as you might use to close a mountain bike seat clamp, for example, you have probably over tightened and risk damaging the frame on your Brompton.
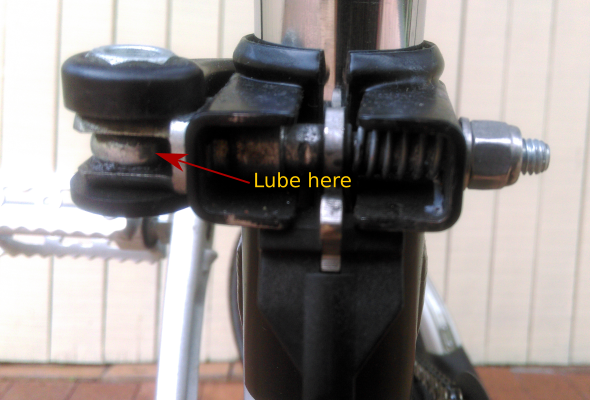
The other problem you may be having with the clamp is that it may have dried out. If there’s any noise coming from it when you open or close, it’s too dry. Similarly, if you can’t close the clamp all the way against the frame, it’s too dry. You’ll need to lube it as indicated in the photo below but be careful that you don’t get lube on the seat post because that will accelerate the creeping all the more. A good strategy is to take the seat off and slide the seat post out while you do the lubrication and wipe any excess of with a clean rag thoroughly before replacing the seat post.
If you’re still experiencing the seat post creep after that, the seat post sleeve inside the frame may be worn and you’ll need to replace it. As far as I can tell, you can do those replacements yourself but because I’m lazy and cowardly, I got the guys at Epic cycles to do mine.
So there you have it – a few possible solutions to common annoyances with your Brompton. Enjoy.